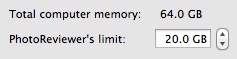
PhotoReviewer User ManualLast modified September 11, 2013. By Ben Haller. Copyright © 2013 Stick Software. [ This manual is obsolete. It was written for version 2.1 of PhotoReviewer, but also applies to version 2.2; places where version 2.2 differs from version 2.1 have been called out with Note: comments, and a new section at the end covers new features in version 2.2. The manual for PhotoReviewer 3 is located here. PhotoReviewer 3 is recommended for all users on macOS 10.15 or later. ] PhotoReviewer is a photo management application for Mac OS X. This manual assumes that you have already downloaded a copy of PhotoReviewer; if not, click here for PhotoReviewer's main page at www.sticksoftware.com. It also assumes that you know all the basics of using the Macintosh in Mac OS X, including using the mouse, menus, and windows, and opening and saving files. Right now this "manual" is structured as an FAQ (frequently asked questions) list, because PhotoReviewer is a simple enough app that it doesn't seem to merit a full manual — that would just be a lot of work and would probably be less effective at answering actual user questions. We hope this format helps you actually find the answers to your questions. Please send comments on this manual to us at our support email address. Thanks! QuestionsInstallation & setupWhat is PhotoReviewer? What does it do? How and where do I install PhotoReviewer? What are PhotoReviewer's system requirements? Basic conceptsWhat is a typical workflow using PhotoReviewer? How does my review get processed at the end? Review setupWhat's in the Setup panel I see at launch? What's the point of grouping files together? What's the best way to work with raw images? How do I import photos from my digital camera? ReviewingNow that my review is set up, what do I do? What about the image information display? How do I use the visibility control? How do I use histograms in PhotoReviewer? How do I use full-screen mode? How can I vote or rename images in bulk? PreferencesWhat are all these preferences? (General tab) What are all these preferences? (Histograms tab) What are all these preferences? (Sorting tab) What are all these preferences? (Key Controls tab) Other questionsWhat's new in version 2.2 of PhotoReviewer? Why don't my images stay rotated? Why can't I crop my images? Can I review images that I have imported into iPhoto? What known bugs and issues affect PhotoReviewer? What is shareware? How do I pay? What is PhotoReviewer? What does it do?PhotoReviewer is an application for managing large numbers of incoming photographs. Digital cameras make it very easy to take hundreds, if not thousands, of photos; most of those, however, you don't ultimately want to keep. Most methods of weeding a large photo collection down to the "keepers" don't work very well. Viewing the photos in Preview, for example, is slow, and it's difficult to sort the photos into "keepers" and "rejects" — you have to keep switching to the Finder. Importing the photos into iPhoto isn't much better; it's very slow, doesn't make it easy to compare photos side-by-side, and doesn't allow for a very efficient review process (partly because you keep having to wait for iPhoto to "refine" its display). Trying to review the photos directly in the Finder doesn't work either; the Finder's preview is too small to allow you to compare photos well, and it's even slower than iPhoto. So this is the gap PhotoReviewer fills. PhotoReviewer works very quickly. Getting going on a collection of tens of thousands of photographs has a start-up time of just a few seconds (try doing that in iPhoto!). Moving from one photo to another is almost instantaneous; you can hold down a key and flip through your photos like riffling through the pages of a book. Designating a photo as a keeper or a reject is a matter of a single keypress (and you can configure up to 10 additional "sorting folders" that are also available with a single key). Once you've pared down your collection to the photos you actually want to keep, you can then import them into iPhoto (or whatever) much more painlessly; PhotoReviewer has no concept of an "album", so unless you're content to simply keep your photos in folders in the Finder, you will want a "digital album" app like iPhoto for your long-term photo storage. This may sound like a very simple thing, and indeed PhotoReviewer is a very simple application. But once you've struggled to wade through a few hundred photos in some other application, and then experienced the ease with which PhotoReviewer lets you zip through them, we think you'll learn to appreciate its simplicity. Also worth mentioning is the fact that PhotoReviewer has review features not found in other apps, such as its magnifier and histogram. More on those later. And if you're looking for a low-rent slideshow application, PhotoReviewer can fill those shoes too! How and where do I install PhotoReviewer?PhotoReviewer is a breeze to install. Simply copy the PhotoReviewer application into one of the standard OS X locations for applications, such as /Applications or ~/Applications (where "~" is short for the location of your home directory). No further setup is required. Once you've got PhotoReviewer copied to a standard location, just double-click it in the Finder to launch it, or drag it to your Dock for easy one-click access. Which folder should you use? ~/Applications is the typical location used if you do not have Administrator privileges on your OS X machine, or wish PhotoReviewer to be available only to you, not to other users of the machine. /Applications will make PhotoReviewer available to all users of the machine, but typically requires Administrator privileges for you to copy things into it. For more information on this, see Apple's documentation on using OS X; ~/Applications is the safer choice, however, if you are not sure. Drag PhotoReviewer from the disk image it is distributed on, into the folder where you wish to install it. After it has been copied, you may 'eject' and throw away the distribution disk image. If you are unfamiliar with the use of disk images (.dmg files), you can read more about disk images on Stick Software's web site. To uninstall PhotoReviewer, simply drag PhotoReviewer from your hard drive to the trash. You will need to quit PhotoReviewer before you will be able to empty your trash. What are PhotoReviewer's system requirements?PhotoReviewer 2.2 requires OS X 10.6 or later, and requires a computer that can run 64-bit apps (which includes all recent machines; see Apple's support page). Note: Users on OS X 10.5 and earlier, or with older processors that do not support 64-bit apps, can still use PhotoReviewer 2.1. For advanced digital camera users who shoot "raw" images, exactly which raw image formats are supported by PhotoReviewer depends upon exactly which version of OS X is installed, because PhotoReviewer uses OS X built-in code to read raw images. Non-raw image formats, such as TIFF and JPEG, are of course supported for all digital camera types. What is a typical workflow using PhotoReviewer?The first step in using PhotoReviewer is to get a folder of images that you want to review. Sometimes you will already have such a folder ready to go, but if your photos are on your digital camera, you will need to copy your photos from your camera's storage (typically a CF card, memory stick, or some such) to your computer. There are a few ways to handle this situation: you can import your photos directly using PhotoReviewer (probably your simplest option; see the question below, How do I import photos from my digital camera?), or you can import using Apple's Image Capture app and then review the resulting folder, or you can, with some cameras, copy your photos to your review folder directly in the Finder. For cameras that appear in the Finder as a removable disk, you can also review your photos directly off of your camera; this is not recommended, however, since it means that you probably haven't got a backup of your photos anywhere (you should always have a backup before reviewing your photos, to guard against accidental deletion). Many users have their computer set up to launch iPhoto and begin an iPhoto import when they connect their camera or card reader. When you use PhotoReviewer, this is typically no longer desirable. You can change this behavior inside Apple's Image Capture application; select Preferences from its menu, select the "General" tab in the Preferences panel, and make a new choice in the pop-up menu for "When a camera is connected, open:" (the exact location of this preference may change in different OS X releases at Apple's whim, but a bit of searching should turn it up). If you want to use PhotoReviewer to import your photos, choose it (using "Other..."). To use Image Capture to download your photos, you can choose it in that pop-up menu; if you want to use the Finder to do it, you can just choose "No application". The second step is to review that folder of images in PhotoReviewer. To initiate the review, you can drag the folder to PhotoReviewer, or choose the folder in PhotoReviewer's Setup panel (if you imported your images using PhotoReviewer, you're already there). Later sections of this manual will describe the remainder of the review process (in particular, Now that my review is set up, what do I do?); for now suffice to say that at the end of your review you will typically have a folder with your "approved" photos, possibly other folders with "sorted" photos that you directed to those folders, and possibly a folder of "vetoed" photos (unless you chose to delete them immediately or place them in the Trash). The third step is to do whatever you want with the results of your review. If you ultimately want to use iPhoto to store your approved images, you can now drag your approved folder to iPhoto and make an album there (and you might want to read the question below, Can I review images that I have imported into iPhoto?). You could also work with your photos in any other photo-cataloging application you choose, or simply keep them in a folder and use the Finder to handle them when needed. What you do with your photos after you finish reviewing them is completely up to you; PhotoReviewer makes no assumptions about that, and it keeps no information about your photos after your review is completed. How does voting work?Voting is at the heart of PhotoReviewer's utility; it is the mechanism by which you choose whether a photo is a keeper or not. Each photo in your review starts out undecided; when you cast a vote on an image, you change it to approved or vetoed. That vote has no immediate effect on the image; instead, when you are finished with your review you tell PhotoReviewer to process it, and at that point, your votes will affect your images, moving some to an "Approved" folder, say, while moving others to a "Vetoed" folder, or to the Trash. You can see what the vote is on an image by looking at the action indicator shown for that image. Action indicators will look something like one of these:
The two on the left are the small style of indicator, the two on the right are the large style; you choose which you want in Preferences. The leftmost, with the yellow asterisk, indicates the file is undecided. The next indicates that the file has been sorted into a sorting folder (the folder icon), renamed (the pencil on paper icon), and approved (the green plus sign). The third indicates the image has been vetoed, while the fourth shows the same information as the second, but since it is the large style of indicator, also shows the sorting folder and name chosen (much more on sorting folders and renaming in the following questions). What about the little gray triangle on the right? That tells you that the action indicator is actually a pull-down menu, like so: 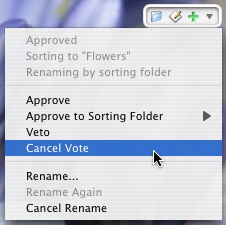 Here the menu has been pulled down, showing that it has commands for changing the vote and renaming. At the top, the menu also gives the full information about the current state of the file: that it has been approved, is being sorted into a folder called "Flowers", and is being renamed using the sorting folder's name. Those status menu items are always dimmed; they are there just for information. Action indicators are the typical way that you look at and change your vote on an image, but there are lots of other ways, and indeed, if you find that action indicators clutter up your windows you can hide them altogether in Preferences. Other ways of seeing and changing votes include PhotoReviewer's main menus, the context menu on an image or selection, keyboard commands, and last but not least, buttons in the window toolbar:  These topics are not really specific to voting, though, since all those avenues can be used to control lots of other aspects of PhotoReviewer too; so they will be covered in other questions. As to what effect your votes have, that will be covered below, in How does my review get processed at the end?. How does renaming work?Renaming of files works in essentially the same way as voting. You tell PhotoReviewer that you want to rename a file, but the actual renaming does not occur until you process your review, at the end. The action indicator shows you whether a file is being renamed or not, and its menu lets you choose to rename a file or cancel the renaming chosen. This is described above, in How does voting work?. There are a few twists, though. One is the way the names are resolved when the review is processed. In PhotoReviewer, when you rename a file you are really choosing a base name, such as "flowers"; you might rename a dozen different photos to this base name. When the review is processed, base names get turned into actual filenames, by having sequential numbers added to them ("flowers001", "flowers002", etc.), by having dates added to them ("flowers001_05-08-2006"), by having a suffix added ("flowers001_original"), and so forth. Exactly how your base names will be turned into filenames is chosen when you process your review. See How does my review get processed at the end? for more on this. Another twist is that a very common method of renaming is not to give an explicit base name to a file, but to simply tell it to adopt the name of the sorting file that the file is being routed to. This is mostly a time-saving convenience; explicitly renaming the file to that name would have the same effect, it would just take an additional step. Normally it is assumed that when you route an image to a sorting folder, you want to rename it using the folder name. That default behavior can be changed, however, in Preferences (under the Sorting tab). The preference takes effect when the file is routed, so you can change the preference back and forth during a review, and only the files routed when the pref was turned on will be renamed. Another way to work with this option is to do a "Cancel Rename" on those files which you do not wish to be renamed, after choosing the sorting folder to route them to; their routing will be unaffected, but they will then not be renamed. See How do sorting folders work? for more. How do sorting folders work?Sorting folders are another concept at the heart of PhotoReviewer's whole reason for being. You can use them in lots of different ways. One is the obvious way, as a way to divide out "beach vacation" photos from "family" photos from whatever else. Another is to use them purely for the side effect they have of causing images to get renamed; combine your sorting folders back together again after processing your review, but keep the renames into "beach001", "beach002", etc. versus "family001", "family002", etc. Another is to use them as a more finely graduated scale for review; rather than just having "approved" and "vetoed", use sorting folders to grade your photos from 1 to 5, say. Finally, you might use them as part of your workflow, with no other, grander meaning; one sorting folder is for photos that are going to your website, another is for photos going to iPhoto, and so forth. For all of these purposes, though, the basic mechanism is the same. First, you set up a sorting folder for the purpose you have in mind. You can set up all ten sorting folders at once in Preferences, or you can configure them individually using the "Change Sorting Folder..." submenu under the Review menu. Another way to get at them is through the Key Controls window (opened via Show Key Controls, in the Window menu), which shows you a list of your sorting folders and has a clickable button to let you configure a folder directly: 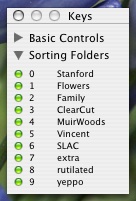 To route an image to a sorting folder, normally you just press the key associated with the sorting folder. This is the number shown on the left side of the Key Controls window; it is configurable in Preferences (under the Key Controls tab). Another option is to use the menu on the action indicator to route your images; another is to use the contextual menu. A final way (this is such a central feature that we give many ways to do it, to suit everybody no matter what their working style) is to use buttons in the window toolbar, which you can simply click to route the selected images to a folder:  You will have to add those buttons to your toolbar first, however, since they are not part of the default window toolbar. How does my review get processed at the end?The short answer is: your files move to where you tell them to, depending upon how you voted on them; they get renamed according to the base names you gave them, figuring in the options you choose during processing; and everybody goes home happy. And that's really mostly what you need to know. The process is fairly self-explanatory. But questions come up, and that's what this manual is here for, so we're going to go through it all in excruciating detail. Rest assured, though, you don't need to read all this unless you really want to. Processing your review involves getting through a sheet that has four stages. The first stage is used to determine where your files are going to go:  The top half controls what happens to your approved files. You have three options:
You choose the Approved Folder you want to use in the combo box below. You can type in a filesystem path (partial paths will be interpreted as relative to the current Review Folder), drag a folder to the combo box, or click the "delta" button to the right of the combo box to browse for a folder. Previously used Approved Folders are remembered (up to ten of them), and may be accessed by clicking the combo box's button. If the chosen Approved Folder does not exist, it will be created during review processing, and sorting folders will be created within the Approved Folder as needed to sort the images in your review. PhotoReviewer does its best to make sure that you have permission to write in the Approved Folder and so forth. This all works similarly for vetoing images, but in that case you have four options:
The Vetoed Folder combo box works as the Approved Folder combo box does. Vetoed images cannot be sorted, however (it is not possible in the user interface to designate a sorting folder for a vetoed image), so sorting folders are not relevant for the Vetoed Folder's operation. Having chosen your approved and vetoed actions, you click Next, and go on to the next step in review processing: 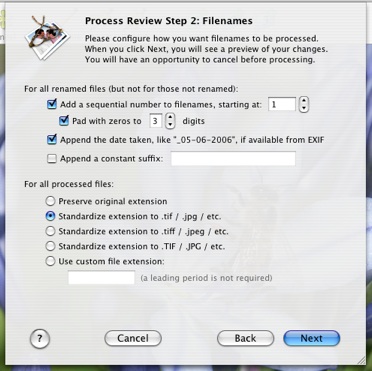 The top half controls how base names, set by renaming images during your review, get converted into actual filenames. Sequential numbers can be added, turning a base name of "flowers" into "flowers1" or "flowers001", for example. The difference between those is controlled by the "pad with zeros" option, which adds leading zeros to the beginning of the sequential number string to make it a fixed-width field in the filename. This is useful for making sure that files have the alphabetical order you would expect; with zero padding, "flowers09" is before "flowers10", whereas without it, "flowers9" is actually alphabetically after "flowers10". You can choose a number to begin sequential numbering at, perhaps if you already have existing files using the same base name. You can append a date, turning "flowers" into "flowers_05-06-2006" or, with sequential numbering on as well, perhaps "flowers073_05-06-2006". And lastly, you can append a suffix to all of that, often used to designate original images versus processed, resized, color-corrected, or otherwise modified images, with filenames such as "flowers073_orig" versus "flowers073_web". There is one aspect of this worth delving into. What happens when your Approved or Vetoed folder already has files in it? Suppose a file in your review would, according to your settings, be renamed to "flowers073.jpg", but a "flowers073.jpg" (or a "flowers073.tif", for that matter) already exists in one of those folders? The answer is simple: PhotoReviewer takes this into account when it chooses the number at which it will begin its sequential numbering. If the highest numbered existing "flowers" file is "flowers073.jpg", for example, then PhotoReviewer will begin sequential numbering for any new images renamed with a base name of "flowers" starting at 74. The "starting at" number you set in the Process Review sheet is used only if it is higher than all existing file numbers for a given base name, or if there are no existing files with a given base name. This policy is carefully designed to simply do the right thing. You should not have to babysit your file numbering; that kind of menial task is supposedly what computers are for, right? The bottom half controls what file extensions PhotoReviewer puts onto files. You can simply leave them as they were, or you can standardize your extensions to various standard forms (three-letter extensions are more Windows-compatible, upper-case three-letters ones may be required by some tools, and so forth). A custom file extension may be applied, for example to designate your small JPEGs as thumbnails of larger images by using a ".THM" extension. Custom extensions should be used carefully, however, since your files may then not be recognized by many programs, and may open in a different application when opened from the Finder. Now that you've got your renaming all sorted out, you click Next, and go on to the next step in review processing: 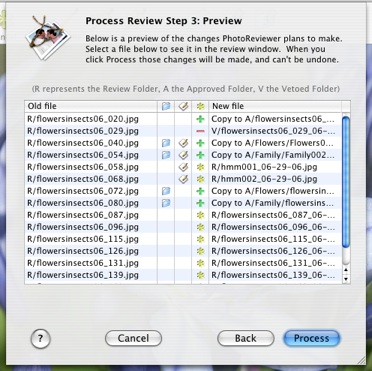 This preview shows you exactly what PhotoReviewer plans to do to your files when it processes them. The three icon columns show the action that was chosen for the file, using the same symbols as the action indicators do. The left column shows the original file's name and path (folder location in the filesystem), and the right column shows the name and path it will be given. Note that, as in this screenshot, the panel may not be big enough for you to see the full paths; you can resize the sheet to give more room, or change the column widths to see more. A shorthand is used in this table, the shorten the paths shown for files. The Review Folder is simply shown as an 'R', the Approved Folder as an 'A', and the Vetoed Folder as a 'V'. It all looks rather cryptic at first, perhaps, but once you learn to read it, you will appreciate the information it is giving you: since processing a review can involve moving, renaming and deleting hundreds of files, it can be a little scary clicking that "Process" button. But now let's do that: click the Process button. This leads us to the conclusion of our review:  May all your reviews end this way. If errors do occur, however (files that can't be moved because of permissions problems, for example), they will be listed here. Typically you would leave this error sheet open while you go to the Finder and hunt down your files, fixing things up given the errors that occurred. It's worth noting that the Process Review sheet has both a Cancel and a Back button. The Cancel button cancels review processing completely; it puts you back into your review, and you may continue voting, sorting, and so on. The Back button just moves you back one step in the Process Review sheet; if you look at the preview and realize you want to number your files differently, for example, just click Back, change your settings, and go forward again. What's in the Setup panel I see at launch?The Setup panel is where you tell PhotoReviewer what images to review: 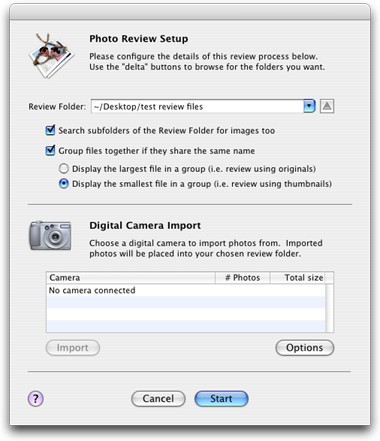 Note: This snap shows the setup panel in version 2.1. In version 2.2, a few new controls have been added to support "downscaling" reviewed images. See the section on What's new in version 2.2 of PhotoReviewer? for more information on those controls. The top part of the panel is where you choose your Review Folder's path. You can type a full filesystem path into the combo box, select a previously used review folder by clicking the combo box's button, drag a folder into the textfield to review that folder, or click the "delta" button on the right to browse for a folder to review. The "search subfolders" checkbox controls whether subfolders of the Review Folder are searched for images, in addition to the top level of the Review Folder. If there are no subfolders within the Review Folder, then this setting doesn't matter; and if there are subfolders, then you probably know whether you want images in those folders to be part of your review. The checkbox and radio buttons below that control file grouping. If file grouping is turned off, every image file in the review folder is treated as a separate reviewable file. This is the standard, simple behavior that a user who had read the preceding sections of this manual might expect. But if file grouping is turned on, then files in the review folder which share the same name but have different extensions, such as "IMG_0203.jpg", "IMG_0203.THM", and "IMG_0203.txt", are grouped together into one reviewable entity. If more than one of the grouped files is a displayable image file, PhotoReviewer will choose either the largest (typically the original image) or the smallest (typically a thumbnail generated by the camera) to display in the review window. All of the grouped files will "travel together"; if the group is renamed, or moved, or whatever, all of the grouped files will receive exactly the same fate, while keeping their unique file extensions. This is a very powerful concept, and some uses of it will be discussed in the next question, What's the point of grouping files together? The bottom part of the panel has to do with importing photos directly from your digital camera. Importing from your camera is covered below, under How do I import photos from my digital camera? The photos imported will be placed in the review folder that you chose in the top part; and then, having imported them, you can click the Start button at the bottom. The Setup panel will disappear, the review window will open, and the first photo in your chosen Review Folder will be displayed. What's the point of grouping files together?This feature, whose basic functioning was described in the previous section, has several uses, which we'll discuss here a bit. One is simply to keep the files from your camera together. If your camera generates separate .THM thumbnails, and you want to keep them, then it makes sense to group them together with the main images and review them all together. This is pretty obvious. A more subtle way to use the feature is to actually generate your own derivative files based upon your originals, and review them as a group. For example, if your original files are very large raw images, you may find that trying to review them directly in PhotoReviewer uses too much memory, and reading them in during the review takes too long. An excellent solution for this is to use a batch-processing app (both GraphicConverter and Photoshop Elements have this facility) to generate smaller JPEG versions of your originals. Go get yourself a cup of coffee (or a day at the spa, depending on how fast your machine is). Then start a review, grouping your files together, and display the smallest file in each group — in other words, the small JPEGs you just made. PhotoReviewer will be all over those like a kitten on a ball of string, and your huge raw images will get renamed and sorted as a side effect of your review of those smaller JPEGs. Note: Image downscaling, new in version 2.2, provides a new and perhaps better way to handle this issue; see What's new in version 2.2 of PhotoReviewer?. A power-user purpose for file grouping is to keep text or XML files along with your images that specify additional information, from "tags" like the names of the people in the photo, to scripting commands or other technical content that assist you in doing further processing of the images in an automated fashion. Whenever you review images that you have annotated in this way, simply use file grouping to automatically keep your annotations along for the ride. For all of these purposes, though, remember: for files to be grouped together, their names must match exactly, except for the extension at the end, like "red.jpg", "red.THM" and "red.xml". It might be useful for this to be extended, so you could group files like "red_original.jpg" and "red_scaled.jpg", but that is not how it works right now, and thinking about exactly how renaming would interact with such a scheme makes black spots start to appear in front of... well, anyway, don't try to do that, it won't work. What's the best way to work with raw images?Raw image files are a special type of image files saved by relatively high-end digital cameras (and an increasing number of less high-end cameras as well). They consist of raw sensor data from the camera, unfiltered and unprocessed. They typically contain too much "noise" to be immediately usable, but when processed correctly, they can yield the highest possible quality of output from a given camera. Many serious photographers therefore shoot raw images. There are a lot of kinds of raw files; every camera manufacturer has their own format, and each new camera typically adds a new format to the list (even when the extension, like ".MRW" or ".NEF", remains the same). Apple has built support into OS X 10.4 for a variety of raw image formats, and PhotoReviewer, since it uses Apple's code to read images, inherits that capability. If a camera is not supported by Apple, however, then it is also not supported by PhotoReviewer. Bugs in Apple's code may also affect PhotoReviewer's raw image support. Working with raw images can place special stresses on your workflow. One issue is that raw files can be extremely large, many times the size of the JPEG file you could have shot instead; so they can eat up both memory and hard disk space very rapidly. Another issue is that they can require specialized, painstaking processing to actually realize their potential; careless, automated processing of raw images really misses the whole point of the format, since the automatically processed JPEG or TIFF your camera could have saved would probably have been just as good. When working with raw images, therefore, there are a few considerations that may help things along. First of all, don't take the way that PhotoReviewer displays the image too seriously; it is based upon a simple, automated conversion from the raw format, and is undoubtedly inferior to what you will be able to achieve later with more specialized software where you can adjust brightness, contrast, and other variables. Use PhotoReviewer to evaluate composition, sharpness, and such things; but if the color balance seems a bit off, for example, don't sweat it; you will be adjusting that later on in your workflow. Secondly, you may not actually want to work with your raw images directly in PhotoReviewer at all, because they are so large and take up so much memory. The recommended workflow is, instead, to use a batch image processing program (GraphicConverter or Photoshop may fit the bill). Convert all of your raw images into high-quality JPEGs, at half the size, and save those JPEGs right alongside the raw originals, with the same filename but with a .JPG extension. That done, review the folder that contains both the originals and the JPEGs in PhotoReviewer. In the Setup panel, choose to group the files with the same names together, and to display the smallest of the grouped files (the JPEGs, in other words). Do your review as usual; your raw images will be moved, renamed, etc. right along with the JPEGs you are reviewing, but your review will be much faster and less memory-intensive. An extra step in involved, in doing the batch conversion; but if extra steps are a major concern, you probably shouldn't be shooting raw in the first place. Note: Image downscaling, new in version 2.2, provides a new and perhaps better way to handle this issue; see What's new in version 2.2 of PhotoReviewer?. Thirdly, if PhotoReviewer can't work with your raw images at all because their format is unsupported, note that the strategy described in the previous paragraph works around that issue, as long as your format is supported by your batch conversion utility. No need to wait for Apple to add your camera! More information about grouping files can be found in the previous section, What's the point of grouping files together?. Some information about supported raw formats, and known bugs with raw support, can be found in What known bugs and issues affect PhotoReviewer?. How do I import photos from my digital camera?Step one is to get into the Setup panel, by choosing "New Review..." from the Review menu. Step two is to choose your review folder, as described in What's in the Setup panel I see at launch?. The photos you import will go into that review folder So now how do you actually import them? Let's look at the controls in the bottom part of the Setup window:  This is where the action happens. When a camera is connected, it changes to look like this (for a Minolta DiMAGE A1, which is a great camera, by the way, love the image stabilization feature, great lens...): 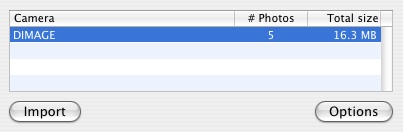 If more than one camera is connected, each will appear as a separate item in that table. The number of photos and total download size for each camera is shown giving you some idea of how big a proposition you're setting yourself up for. And if you're ready to import from a camera, you just select that camera in the list and click "Import". Then it'll do something like this: It will import all the images, and let you know when it's done: Simple as that. Ah, but what about that "Options" button? Well, it displays a sheet of options which will affect exactly how your images are imported: 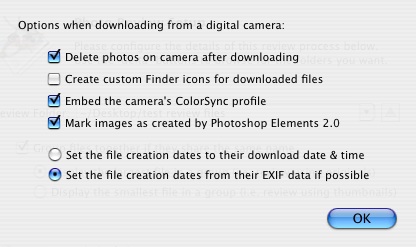 Note: Some of these options have been removed in version 2.2; see below. These options are reasonably self-explanatory, but here's some analysis of what they do:
When you finish importing images from your camera, PhotoReviewer may ask you a question: 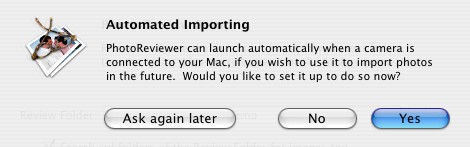 Here's what that's about. OS X detects when a camera is connected to your machine, and can automatically launch an application to help you handle importing the images. PhotoReviewer, since it can import images, is one application you could choose to auto-launch in those circumstances. If you do an import in PhotoReviewer, it will check whether it is currently set as the "handler" when a camera is connected, and if it isn't, it will offer to "rewire" your system for you. If you're not sure, just click "Ask again later". If you want to use PhotoReviewer to import your images in the future, just click Yes; or if you're happy with your machine's setup the way it is, click No and nothing will be changed. This setting is officially handled by Apple's built-in "Image Capture" application (in your /Applications folder). If you ever want to change this setting, just run Image Capture and open its Preferences panel. Once you have answered Yes or No to PhotoReviewer's question, there is no way to change the setting within PhotoReviewer, because Image Capture is the standard place where that preference is changed. Now that my review is set up, what do I do?Once you've set up your review and you have the review window displaying your first photo, you may wonder: what next? The basic idea of PhotoReviewer is: make a decision on the currently displayed image, tell PhotoReviewer your decision, repeat.
So as you go along approving and vetoing, the list of images left to review gets shorter and shorter (if approved and vetoed images are not visible, which is probably the usual way to conduct a review). You can see where you are at any time by looking at the title bar of the window: It will say something like "x of y", which tells you the index of the current image being displayed (x) and the total number of images left to review (y). At some point you will run out of photos to review, and PhotoReviewer will suggest that now would be a good time to process the review. You are not required to do so, though; you might go back and look through your vetoed images next, to see if any good photos landed there by mistake, for example. Often it is easiest to work sequentially, but you don't necessarily have to be that linear. Just flip through your thumbnails using the thumbnail scroller on the left, and click on whatever image you want to see. You can also use the arrow keys, or the "Select Next" and "Select Previous" menu items, or the corresponding toolbar buttons, to move among the images in your review freely. It is also possible to find an image based on its filename, its index in the visible review files, or even at random; there are menu items and toolbar buttons for all of these actions. How do I use Image Mode?
Image Mode is for examining one image, or a small group of images, closely at large size. The review window will show you the image or images (up to nine) that are currently selected. You can change the selection by clicking on a thumbnail in the thumbnail scroller on the left (and shift-clicks, command-clicks, etc. do work there, by the way), or by using the arrow keys, the Select Next and Select Previous commands, the Find commands, and so forth. In Image Mode, the magnifier and histogram may be used. They can be turned on and off via commands in the Window menu; there is also a keyboard shortcut for turning the magnifier on and off, which is "/" by default but may be changed in Preferences. More about the magnifier is in the question below, How does the magnifier work?, while more on the histogram feature is in the question What are histograms and how do they work?. Selecting more than one image displays the selected images side by side. This can be quite useful for comparing similar images for details like sharpness, facial expressions, and so forth. When images are displayed side by side, each one shows its own magnifier and histogram, so that the information from those can be compared side-by-side as well. If the images are very similar, you may want to use the magnifiers in both images to compare exactly the same areas, in a synchronized fashion. To do this, just hold down the shift key while you drag one magnifier; the other magnifiers in side-by-side images will be dragged together with it. When you're in Image Mode, a double-click in a displayed image will open that image in your external image application (chosen in Preferences). This is useful if you want to edit the image, by correcting red-eye, for example. You can make whatever changes you wish, save the image back to disk, and when you return to PhotoReviewer, your changes will be detected and the image will be reloaded. The "open externally" command is also available through the toolbar and menus.
How do I use Thumbnail Mode?
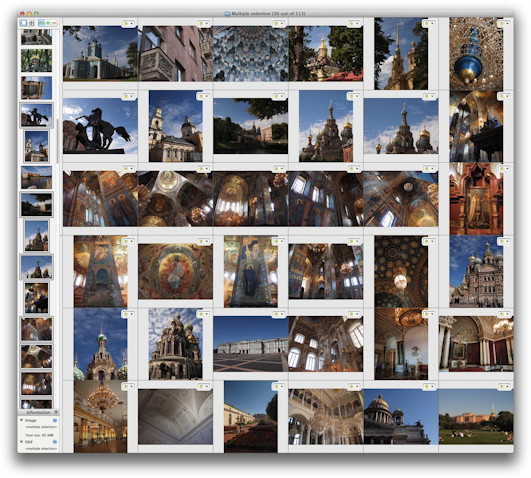
Thumbnail Mode is for taking a step back to see the forest rather than the trees, so to speak. Every image is displayed simultaneously as a small thumbnail in a scrollable view. The overall size of the thumbnails displayed can be changed, either in Preferences (the hard way) or using the size control located just below the scroller for the view, at the lower right (Note: In version 2.2, now the upper right) of the window (the easy way): 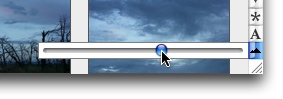 As for the other two buttons visible in that screenshot: the top one, with the asterisk, toggles whether action indicators are shown or hidden in Thumbnail Mode, while the bottom one toggles whether filenames are shown below the thumbnails or not. Just click them to change their state. (Those settings are also in the Preferences panel.) In Thumbnail Mode you can still select images, cast votes, rename, and so forth. There are some things that cannot be done in Thumbnail Mode, however, principally because the magnifier and histogram are unavailable. Thumbnail Mode is not really for examining individual images at that level of detail, since there is not enough screen space to do so; it's for "surveying the territory" and making sweeping changes, like selecting all of the images you took at the beach and renaming them "beach".
What about the image information display?The information display is located under the thumbnail scroller on the left side of the review window. If the left-hand panel is "collapsed", because its splitter has been dragged all the way to the left, then it will not be visible; and similarly, the info display itself can also be collapsed by clicking on its title bar. If things are expanded so that it's visible, however, then it looks something like this:  The values displayed will vary, but the basic format is always the same: non-EXIF information, such as the image's size, creation date, and so forth are shown on top, EXIF information such as shutter speed and f-stop are shown below. Each section has a disclosure triangle that lets you hide that section, or you can collapse the whole info display by clicking on its title bar. But what about those little blue buttons? They are there to let you change what information is shown in the info display. Just click one of the buttons, and a pop-up menu will appear with choices, like this: 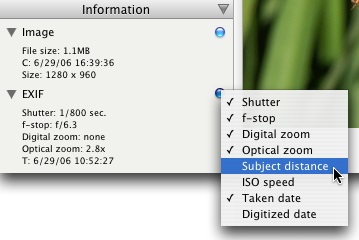 However, there is a source of confusion with this. If you turn on a particular setting, as "Subject distance" is being turned on in the snapshot above, but that information is not available from the EXIF tags in the displayed image, then that tag will simply not be shown. So you can have "Subject distance" checked, and still not have "Subject distance" being displayed in your info display; this is because your camera does not support the necessary EXIF tag. There are quite a few EXIF tags, many of which are fairly obscure. We doubt, for example, that many users need to know which Opto-Electric Conversion Function (OECF) was used for their image. We've tried to provide the ability to display all of the tags that seem likely to matter in a review, but if the tag you want seems to be unsupported in PhotoReviewer, please let us know. How do I use the visibility control?
That's the easy part; the bigger question is, what is it for and how is it normally used? Generally, when you're doing an initial pass through your files you probably want to have it set so that only undecided files are visible. This way once you approve or veto a file, it will be taken out of your way, and the next undecided file will automatically presented. But in later stages of a review, you might want to go back and check your work. You could switch to looking at the images you vetoed, to make sure you didn't accidentally veto a good one, for example. Or you might make all files visible, to see a "big picture" overview in Thumbnail Mode of which ones got approved and which got vetoed. The power of this control, really, is that you can use it to do whatever you want. Note that the default visibility settings for new reviews can be set in the Preferences; for more information, see What are all these preferences? (General tab). How does the magnifier work?Even when you're in Image Mode, you're not really seeing your images at full size, unless they are relatively small. With today's digital cameras, images are often many times larger than even the largest screens. What you see in Image Mode is generally a scaled version of your images, sized to fit into your review window. But sometimes you need to see the individual pixels of the full-resolution picture, particularly to check the sharpness of important areas of the photo; this is the purpose of the magnifier. Using it couldn't be easier. You just turn it on ("Show Magnifier" in the Window menu, or use the keyboard control, which is bound to "/" by default), move it to the area you want to magnify (click-drag inside it), and there you are. Here's a demonstration of the magnifier, to make this clearer:
The image on the left shows a detail from a scaled image displayed in Image Mode. If you wondered how sharp the tractor actually was in the original photo, you could turn on the magnifier and drag it over to the tractor, and see, as in the second image, that you've got good detail down to the full resolution of the CCD of your camera. This tells you that you might be able to print that photo at a larger size without it getting blurry, or that it's better than the other photo you took where the tractor wasn't quite in focus. The only other feature of the magnifier worth mentioning is its "synchronized" operation. Suppose you are viewing two family portraits side by side, and you're not sure which one to keep. The photos are virtually identical, taken one right after the other; but you suspect that the little details, like whose eyes are closed, make one better than the other. You can examine the corresponding areas of the two photos easily by "synchronizing" the magnifier: when you drag it, hold down the shift key. This will make the magnifier in the other side-by-side image move as well, allowing you to easily discover that in the photo on the left, a fly has landed on your Aunt Agnes' nose. (Which photo you therefore keep presumably depends upon your opinion of your Aunt Agnes.) What is a histogram?A histogram is... well, according to the dictionary in OS X a histogram is "a diagram consisting of rectangles whose area is proportional to the frequency of a variable and whose width is equal to the class interval". But if you find that less than illuminating, here's a histogram from PhotoReviewer, on the theory that a picture is worth a thousand words:
The histogram is, of course, the picture on the right; it is based upon the photograph on the left. The vertical axis is number of pixels, the horizontal axis is brightness (darker to the left, brighter to the right). Four curves are shown, which represent the number of pixels of different brightnesses for red, green, and blue, and for the overall image brightness. What can we tell from this histogram? First of all, the histogram is pretty complex, because this image is more complex than it appears at first glance; more complex than, say, a red flower on a black background. Different elements, such as the tree, the tractor, and the mountains, have quite different colors and brightnesses. The "jagged" appearance is because things in this photo tend to be either bright or dark, not inbetween. The earth, since it is furrowed, has dark and light alternating stripes. The tree in the foreground has leaves that are in direct light, and leaves that are not. Some of the trees in the background are in direct light, most are not. Each of these binary divisions in lighting creates a pair of peaks in the histogram. This is typical of a photo of a complex subject shot in hard, direct light; a portrait shot with soft studio lighting would have a much smoother, more gradual histogram. But the big thing this histogram can tell us is that the picture is fairly low in contrast. There are essentially no pixels close to black (the curves all fall to the bottom on the left side of the histogram), and essentially no pixels close to white (the curves all fall, again, on the right side of the histogram). A camera with adjustable contrast might allow you to shoot the photo with a wider contrast range; or you might find that the photo benefits from being "expanded" in a program like Photoshop. Or, perhaps best, returning to that location to shoot a similar photo under less hazy conditions might work (although this photo was taken in Hokkaido, Japan, which decreases the odds that that will happen). If you have developed a photographer's eye, you can see all this anyway. The brightest parts of the image are the snow on the mountains, and it is visibly darker than pure white. The darkest parts are on the tractor, and we can see (with the magnifier, in the previous question) that they are not really black, either, but actually a fairly light shade of gray. Having a histogram makes this sort of analysis more quantifiable, however, and can help out when an image is hard to judge by eye. Here's a photo with a different problem:
At the top end, this histogram looks similar to the previous one; the curves all fall to the bottom before we reach the right-hand edge. But at the bottom end, it's a different story. The red, green and black curves all tail off very nicely right at the left edge, but the blue curve is just starting to come down when it hits the left edge, and then it spikes upward at the very left. That tells us that there are quite a few pixels which registered as having no blue whatsoever, but which probably did in fact contain some blue information that would have continued the downward slope of the blue curve prior to the spike. Together, these facts tell us the photo is probably underexposed; the whitest areas could be increased in brightness without losing much, if any, highlight detail, while the darkest parts may be suffering a loss of shadow detail. This is an issue that might be hard to see looking at the photo onscreen, but might be immediately obvious in a high-quality print; so before wasting your time making that print, check the histogram! As to what to do about it, the shadow detail that is lost is lost for good; it cannot be regained in Photoshop because the information was never recorded by the camera's CCD. Shooting the photo as a "raw" image might have allowed the brightness to be adjusted, since raw images contain more information than JPEGs and TIFFs; or shooting a "bracket" of exposures at the scene, with different exposure levels, would probably have provided a shot whose exposure was better. If you can't reshoot the photo, you might simply expand the curves a bit in PhotoReviewer, bringing the brightest pixels up to white so the distant snow has more punch; that is a greater concern than the lack of shadow detail in the distant trees, probably. Here's a photo that looks spot on (of algae and reflections in a pond, if you're wondering):
The curves trail off beautifully at the left and right, using the full contrast available with no clipping of shadows or highlights (or just a tiny bit, at the top end, but that can be all right; the brightest highlights and "sparkles" in an image are often so very bright, in fact, that to bring them into range would make the whole rest of the photo go dark, since they are often direct reflections and refractions of the sun; there is no highlight detail being lost by clipping them at white). A final example:
This is actually a cautionary tale about histograms. Looking at the histogram, you might conclude that the image is massively underexposed; it appears to have almost no pixels brighter than about a 20% value or so, and it looks like it has a big spike of pixels clipped to zero brightness. And in a sense that is true; the vast majority of the picture is black or almost black, to the extent that large parts of it have no shadow detail or texture whatsoever. However, it's a pretty good photo, and is exactly what the photographer intended to capture. The surrounding darkness serves to highlight the brightly lit areas, making them stand out with a magical glow; detail and texture in the darker areas would only dilute this impact. The lesson? Only this: the histogram is a tool, nothing more. It cannot tell you whether a photo is good or not; only your individual aesthetic judgment can tell you that (and, of course, any critics standing nearby). But when used properly, the histogram can be a very useful tool for giving yourself more information upon which to base that judgment. This was actually an extremely quick skim over the topic of histograms; no doubt there are whole books written on the subject, and no doubt Google can give you lots more information, too. We didn't touch on what the individual color curves tell you, as compared to the overall brightness curve; nor did we get into the meaning of more complex curve shapes and how they might imply that a photo ought to be processed. It's a very complex subject! But even at a simple level of understanding such as this little tutorial has given you, PhotoReviewer's histograms should prove useful to you. How do I use histograms in PhotoReviewer?OK, that's a simpler question to answer than the previous one. Histograms are visible only in Image Mode, not in Thumbnail Mode. Turn histogram display on and off using the menu item in the Window menu. Exactly how the histogram appears, and exactly how (and whether) histogram data is collected by PhotoReviewer in the first place, is controlled by the histogram pane of Preferences; those preferences are covered in their own section, What are all these preferences? (Histograms tab). So that's all there really is to say about that, then. Note: A couple of new features related to histograms have been added in version 2.2; see What's new in version 2.2 of PhotoReviewer? for more information on those features. How do I use full-screen mode?Full-screen mode is great for getting a bigger, higher-resolution look at your photos. If you hide all the extraneous clutter, you can even do a nice slideshow with PhotoReviewer, since it hides the menu bar and everything for you. And if you're comfortable working without the menu bar, you can actually do your whole review in full-screen mode.
When working full-screen, people often like to have most of the screen "blacked out" except for the image they're viewing. To this end, PhotoReviewer has several preferences that involve changing background colors of user interface to black, hiding user interface, etc. when in full-screen mode. If you tailor these preferences to suit you, most of the clutter will go away automatically. With all the clutter hidden, you still have the context menu on the image available to you, where you can vote, rename, and so forth, so that is a perfectly usable mode for reviewing. The only other twist is that you can hide the whole left-hand panel — the thumbnail scroller, the mini-toolbar, and the image info display — by dragging its splitter all the way to the left. It will seem to "stick" at a minimum width, but if you keep going all the way to the left margin, it will snap closed. When you let go, even the splitter fades out, leaving you with a pristine environment for viewing. When you want to make that left-hand panel visible again, just move the mouse over to the left, and the splitter will fade in; drag it to the right, and you're in business. There are lots of ways to leave full-screen mode. Press the key binding again ("`" by default), or click the mini-toolbar button, or press the key combination for the menu item (shift-command-H), or, to help those who can't remember those other ways, simply press the "esc" (escape) key to "escape" back to normal operation. How can I vote or rename images in bulk?OK, so when we talked about voting and renaming back at the beginning (see How does voting work? and How does renaming work?), we glossed over a little point. We ran through a list of the controls you could use to approve an image, or veto, or rename, and we said they were all pretty much the same. The caveat has to do with bulk renaming. So here's the core distinction: there is the single image you click on to do something, and then there is the set of selected images, which may include several images (or all of the images in the whole review, for that matter). If you have just one image selected, then those two things are the same. But if you have several images selected, then they're not the same any more, and that's where the caveat comes in. When you right-click or control-click on an image to get its context menu, or pull down the menu for its action indicator, you are operating on that image. Period. So when you're viewing side-by-side images, and you want to approve one but not the other, use one of those methods to vote. When you use any "global" user interface, such as a toolbar button, or a menu item from one of the main menus, you are operating on the entire selection. Period. After all, which image would it perform the operation on? There is no context with which to make that choice; so it operates on them all. The only tricky bit about this is that a context menu on a thumbnails runs on the whole selection. That's true whether the thumbnail is in the thumbnail scroller on the left, or is in Thumbnail Mode's view. This makes sense to some extent, because thumbnails are about the big picture — the forest, not the trees — but to some extent it is an arbitrary exception, so it may be a bit confusing until you get used to it. The action indicator for a thumbnail still controls only that image; action indicators always control just the single image that they are associated with. But the context menu on a group of selected thumbnails will control the fate of all of the selected thumbnails, even though you brought it up by right-clicking or control-clicking a particular thumbnail in that group. Perhaps the best way to think about it is: you didn't really right-click or control-click on a thumbnail, you right-clicked (or control-clicked) on the selection. And so you're operating on the selection. Now that we've talked that to death, the answer to the original question should be quite clear. To process images in bulk, simply select all the images you want to perform an operation upon, and then choose that operation from the global user interface: the toolbar, the main menus, or the context menu for the selection. This is very useful for vetoing images that are so bad that you can see they're bad just from their thumbnail; for renaming all of the images in your review right at the beginning; for sorting images based upon obvious criteria (beach or non-beach?) that can be seen in Thumbnail Mode; and so forth. What are all these preferences? (General tab)This section describes the preferences on the General tab of the Preferences panel. This tab is a mixed bag of preferences for everything that is not specifically related to histograms, sorting folders, or keyboard controls. It looks like this: 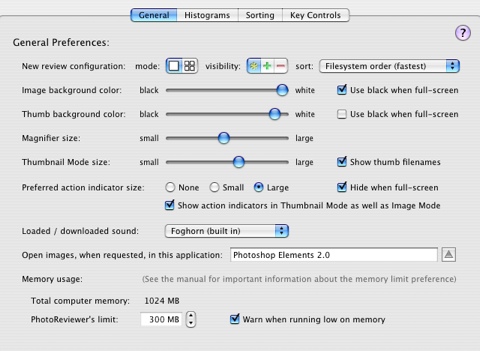 So, tackling them from top to bottom: These controls configure how new reviews will be set up. By default, new reviews are in Image Mode, only undecided files are visible, and the files in the review have whatever sort order they were given by the filesystem; PhotoReviewer does not take the time to resort the review files (which can take a noticeable amount of time, for reviews containing many files). But if you wish to, you can change all of those things here, so that your reviews are set up just the way you want them. Changes made here affect only new reviews; the current review is not changed. For more information on the display modes, see How do I use Image Mode? and How do I use Thumbnail Mode?. For information on the visibility control, see How do I use the visibility control?. The "Image background color" slider controls the background color shown behind full-size images in Image Mode. A shade from black to white can be chosen with the slider. Often users want the background to be black when they are in full-screen mode, so the checkbox controls that separately. The "Thumb background color" slider controls the background color shown behind thumbnails, both in Thumbnail Mode and in the thumb scroller on the left. A shade from black to white can be chosen with the slider. Often users want the background to be black when they are in full-screen mode, so the checkbox controls that separately. The "Magnifier size" slider controls the size of the magnifier in Image Mode. Note that this size is relative to the size of the image displayed; if your review window is larger, your magnifier will be larger, while if you are viewing nine images side-by-side, the magnifiers on them will be fairly small, since the images themselves are being displayed in quite a small space. The "Thumbnail Mode size" slider controls the size of the thumbnails shown in Thumbnail Mode. This is the same setting as that controlled by the small button below the scroller in Thumbnail View. This setting has no effect on the thumbnails shown in the left-hand thumbnail scroller; the size of those is determined by the width of that left-hand area, which is subject to the splitter to its right.  The "Preferred action indicator size" radio buttons control the size of action indicators shown in Image Mode. Some users like to the have uncluttered view of things when full-screen; checking the "hide when full-screen" checkbox will automatically get action indicators out of your way in that case. The other checkbox determines whether action indicators are also shown on the thumbs in Thumbnail View; they can be useful, but can overwhelm small thumbnails and make the view feel extraordinarily cluttered, so by defult this option is turned off. When action indicators are shown in Thumbnail Mode, they are always the small size, regardless of the size preference chosen; that affects only Image Mode. The "Loaded / downloaded sound" pop-up menu button controls the sound played at the end of lengthy operations. The two lengthy operations, to be precise, are the loading of thumbnails at the start of a review, and the downloading of images from a digital camera when doing an import in the Setup panel. These can take so long that you might go off and get a cup of coffee while you wait; if so, the default foghorn sound should wake you up better than your coffe did, if you've got the volume turned up nice and high. You can almost hear the waves lapping on the beach. (Boy, this manual is beach-themed. I guess I need to visit the coast one more time before the end of summer!) Choose a different sound from your system's built-in sounds in /System/Library/Sounds; sounds located in /Library/Sounds and ~/Library/Sounds will also be found and put into this menu for you. The "Open images..." textfield lets you choose which other application PhotoReviewer considers to be your standard image editing application. This application will be used to open images when you use the "Open in X" command; X is your chosen external application, and so you see we've come full circle. If you wish (see How do I import photos from my digital camera?), images that you import from your digital camera may also be tagged as being "owned" by this application, so that they will automatically be opened in this app when you double-click them in the Finder. You can choose an application from a file browser by clicking the delta button on the right, or type the name of the application you want (exactly!) into the textfield.  The "Memory usage" preference is a complex topic. Take a deep breath before we begin. Note: This section has been updated for version 2.2, but the concepts still apply to version 2.1 also. Imagine you're doing a review of 300 images (less than a day's work, for many!) Each image is, say, 5 megapixels, because you have a 5 megapixel camera (a pretty good consumer camera, but by no means the high end of the scale). Each image pixel takes up three bytes of memory; one byte for red information, one for green, one for blue. (On disk, images may be compressed with JPEG and so forth, but in memory images are generally kept decompressed, because compressed images take too long to decompress to be able to have a quick, responsive user interface working with them, and because the more effective compression schemes, such as JPEG, are "lossy"; they lose information, corrupting the original image slightly.) So a 5 megapixel camera image takes up 5 x 3 = 15 megabytes of memory. So 300 of them takes up, let's see, 4500 megabytes of memory, or 4.5 GB. Your computer, on the other hand, might have as little as 2 GB of memory. The images from your review, in other words, could probably occupy every last byte of memory in your computer, several times over, with no room left for other programs, or even for PhotoReviewer's own code. This demonstrates the need for memory management. You can't keep everything in memory at once, so you have to try to be smart about what to keep around and what not to keep around at any given time. And PhotoReviewer is in fact quite smart about that, which is part of what makes it so fast; but the inescapable fact is that the more memory you have to play with, the more you can keep around, and so the faster you are. But you have to draw the line somewhere; on a 2 GB machine, not only is it not reasonable to take up 4.5 GB of memory, it probably isn't even a good idea to take up, say, 1.5 GB. You could, but the performance of the machine would become very poor, and it would be hitting the disk constantly, doing a virtual memory management technique called "swapping" in order to manage to operate in such cramped memory conditions. The only person who can really judge how much memory it is acceptable for PhotoReviewer to use is you, the end user. If you don't want to think about it, you can just leave PhotoReviewer at its default setting. That should work well for most people doing most reviews. But there are symptoms you may see that tell you that PhotoReviewer would like to have more memory to play with; and if you've got a lot, you can humor it. On a 16 GB machine, it would be entirely reasonable to set the limit to 8 GB or even higher. That's a lot of elbow room, and you can trust PhotoReviewer to use it wisely, making your review more responsive and rapid. What might the warning signs look like? The most obvious is a message from PhotoReviewer saying that it's running short on memory and would like more room. This is an indication that PhotoReviewer has used up the memory allowed it by this Preferences setting, and will start taking measures to avoid using more memory. It might purge some loaded images from memory, keep only scaled versions of some images, or switch to using lossy compression on the thumbnails that it keeps in memory for your images. PhotoReviewer will continue to work, but it might get less responsive. Another symptom is that PhotoReviewer might not be able to keep up with your pace of reviewing, having to display its "Loading" message now and then. This indicates that while it did load in thumbnails for all of your images, it cannot keep around as many scaled images (sized down to fit your window) as it would like. PhotoReviewer keeps scaled images as a strategy for saving memory, actually; a scaled-down image that fits in your window takes a lot less memory to keep around than a full-size original image does, and so more of them can be kept around, producing the illusion, in the best case, that all of your images are in fact in memory all of the time, when in fact none of them are. Or perhaps when you go to a new image in your review, it displays immediately, but the interior of the magnifier is white for a few seconds before it gets around to showing you your full-size image pixels. This indicates that the scaled version of the image was kept, but the full-size original was not, and had to be loaded in again before the magnifier would work. Given our analysis at the beginning, of 4.5 GB memory usage for a typical review, you are unlikely to be able to set PhotoReviewer's elbow room so high that originals are kept in memory for your whole review; so you will probably see this "magnify lag" from time to time. But the more memory you give PhotoReviewer, the more likely it is that a particular full-size image might get kept around; and that's better than nothing. How do you know when you've set the memory limit too high? This was a problem in version 2.1, but in version 2.2 it should not be. PhotoReviewer will not let you set the limit higher than a maximum threshold that is based on the amount of memory your machine has. If you set its memory usage at or near that maximum, you might notice that other applications become less responsive; this is because PhotoReviewer is hogging your machine's memory and forcing other applications to make do with less. However, this is not harmful, and if it bothers you, you can just set PhotoReviewer's memory usage to be lower. What are all these preferences? (Histograms tab)This section describes the preferences on the Histogram tab of the Preferences panel. This tab has, as you might expect, prefs relating to histogram generation and display. It looks like this (Note: A few new controls have been added in version 2.2 relating to new histogram-based features; see the section on What's new in version 2.2 of PhotoReviewer? for more information on those controls): 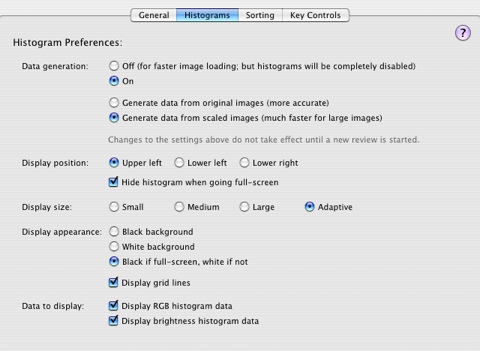 From top to bottom:  The "Data generation" radio buttons control whether and how PhotoReviewer generates the data for image histograms. Generating the data for a histogram takes time, since the entire image represented by the histogram must be analyzed. It's not a terribly complex analysis, but nevertheless, for a large image on a slow machine it can take several seconds. This analysis is done when the image is first loaded in for the review, and the histogram data is then kept for the duration of the review. So if you like to go off for a cup of coffee while your thumbnails load at the beginning, then you might not care about these prefs; turn data generation on, so the histogram is there if you want it, and have it generate from the original images so the histograms are the best possible quality. For others, however, the speed with which a review comes up initially, and the speed at which those first few images get loaded in, matter a lot. As James Brown would say, they've got ants in their pants and they got to dance! If you're one of those, then you've got a decision to make. If you never use the histogram feature, then just turn histogram data generation off; nothing else in the app will be affected, your loads will be faster, and all is well. But if you do use the histograms, you might try setting PhotoReviewer to generate their data from the scaled versions of your images (resized down to fit into the review window) rather than the originals. The bigger your original images are, the more of a difference this change will make for your review speed. The loss in histogram quality is quite noticeable, but probably not so much as to actually compromise its usefulness as a tool. As the comment below this setting notes, these settings only take effect when you start a new review.  The "Display position" radio buttons let you set which corner of your review window the histogram gets displayed in. The upper right corner is reserved for the action indicator, if you're wondering. As for the checkbox, it helps clean up clutter when you're going full-screen by hiding the histogram for you at the moment you switch to full-screen. If you want it back, just press shift-command-H, the keyboard equivalent for "Show Histogram" in the Window menu. The "Display size" radio buttons control the size of the histogram display. The "Small", "Medium" and "Large" settings are self-explanatory. The "Adaptive" setting leaves the size decision up to PhotoReviewer; it chooses a size that it thinks is likely to fit into your review window well, without obscuring too much of your image. The reason this setting is particularly nice is this: suppose you're viewing nine images side-by-side. The area for each image is therefore one-ninth what it is when you're viewing just a single image. If you've chosen a fixed histogram size, it still uses that size; and it may actually be so big that it now completely covers your little side-by-side images. But if you've chosen "Adaptive", it sees the problem and scales itself down.  The "Display appearance" radio buttons control the background color of the histogram display. Pretty self-explanatory; use the third setting if you like your full-screen mode to be blacked out. The checkbox turns the grid lines on the histogram on and off; maybe you find they make it harder to see the curves of the histogram, in which case, there you are. The "Data to display" checkboxes control which curves are displayed on histograms. Users who are relatively inexperienced using histograms may just want the "brightness" data (the thick black curve) displayed; the individual color curves may just be meaningless noise. More experienced users may want both. Really hard-core pros may like working with only the color curves, since the brightness curve is somewhat of a convenient fiction (pixels really have only red, green and blue; the overall color, and the apparent brightness of the pixel, are in a sense just an artifact of how the human eye processes information). Or you can change this setting to suit your changing needs. Note: This section has covered the preferences in version 2.1; see What's new in version 2.2 of PhotoReviewer? for more information on features new in version 2.2. What are all these preferences? (Sorting tab)This section describes the preferences on the Sorting tab of the Preferences panel, which set up the sorting folders used during a review. It looks like this: 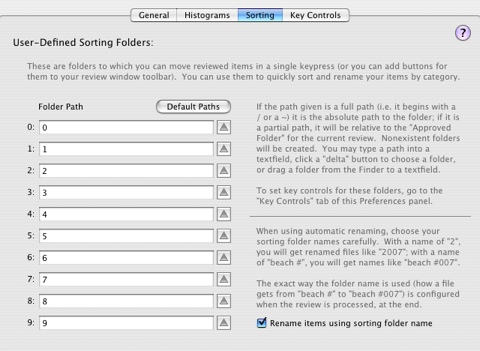 This tab has pretty extensive self-documentation on it, so it doesn't seem necessary to repeat all that information here. Sorting folders are also discussed in How do sorting folders work?. The "Rename items using sorting folder name" checkbox also receives some discussion in How does renaming work?. It is worth noting that there are also two fast ways of changing a sorting folder on the fly, rather than having to open up the Preferences window and everything. One is to use the menu commands under "Change Sorting Folder..." in the Review menu. The other is to use the little green buttons in the Key Controls window, as described in the next question, What are all these preferences? (Key Controls tab). What are all these preferences? (Key Controls tab)This section describes the preferences on the Key Controls tab of the Preferences panel. It is used to set up customized key bindings for the common commands in PhotoReviewer, so that you can drive your review from the keyboard if you wish. It looks like this: 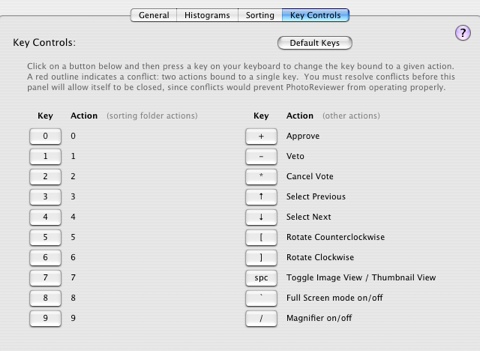
This seems like a reasonable opportunity to discuss the Key Controls window, though. When you set up custom key controls, the next thing you do is forget them, if you're like most folks. A quick way to remind yourself of what your key controls are has therefore been provided: the Key Controls window. It looks more or less as pictured to the right, depending upon your preferences and sorting folders and such. This floating window is shown and hidden with the "Show Key Controls" (or "Hide Key Controls") command in the Window menu. You can use the gray disclosure triangles to expand or collapse the two sections of the window, allowing it to be as small as possible. As for the green buttons to the left of the sorting folders: they let you quickly change a sorting folder in mid-review, without having to open the Preferences panel and find the Sorting tab and everything. (There are also menu items, under "Change Sorting Folder..." in the Review menu, to let you do the same thing). So even if you don't need to be reminded of your key bindings, the sorting folders section of the Key Controls window may be a useful thing to keep open. What's new in version 2.2?Version 2.2 of PhotoReviewer has made several changes and added several new features. These are described here:
   Why don't my images stay rotated? Why can't I crop my images?
PhotoReviewer never modifies your images in any way. It moves them from folder to folder, renames them, and even deletes them; but the image data contained inside the file is never modified in any way. This is a very deliberate design decision, made for a good reason explained below. As a result of this decision, rotation of images doesn't "stick". If you rotate an image in PhotoReviewer, it will be unrotated again the next time you review it, or whenever you view that image in some other application. The only purpose of allowing rotation in PhotoReviewer at all is to allow you to see your images better, in order to better decide what action to perform on them. The reason PhotoReviewer doesn't modify image data is that it gets very messy and there are many hidden "gotchas" involved. For example, suppose PhotoReviewer is able to read and display an image, but there is some extra information (such as the EXIF tags that digital cameras generate) that PhotoReviewer doesn't understand. Ensuring that no information is lost or corrupted, when many image file formats are exceedingly complex and can contain all sorts of auxiliary data besides the actual image itself, is a very tricky thing to do. Another "gotcha" is lossy compression. JPEG files, for example, degrade in quality each time they are resaved, because the JPEG format does not preserve the exact image, but instead a "lossy" approximation of it. If PhotoReviewer regenerated new JPEG data after a rotation operation, the quality of your JPEG images would inevitably be degraded, possibly quite noticeably. There is a technique for doing lossless JPEG rotation that avoids having to actually regenerate new JPEG data, but first of all, I don't fully trust it to handle both all existing JPEG files and all JPEG files that cameras and apps of the future might write; and secondly, it would be inconsistent and odd if PhotoReviewer only rotated one particular type of image, while leaving all other unrotated, so unless a good solution exists for all types of images, I am not inclined to pursue it. These issues are very complex to handle well. iPhoto, for example, creates whole directories containing copies of your original images, your modified images, thumbnails of your images, etc., in an effort to both allow modification of images and to preserve the quality of the original. That level of complexity is something PhotoReviewer wants to avoid; it's part of the reason why iPhoto is so slow (although admittedly powerful) and PhotoReviewer is so fast. And it's comforting to be guaranteed absolutely that your images are not being corrupted or degraded in any way when handled by PhotoReviewer; that's a guarantee that no application that actually modifies your images can make. Your original image is like your "negative" back in the film days; you might want to retouch or even cut up a print, but you want to think very hard before doing such things to a negative, because if you mess up your negative, you've got no way to recover from that. This concern is also the reason why PhotoReviewer does not (and never will) support cropping of photos, red-eye removal, or any of the other modifications people like to make to their photos. That is not what PhotoReviewer is for, and by choosing to embrace that limiting decision, PhotoReviewer becomes a leaner, faster, safer application for the job it is intended to perform. The correct solution to this problem, by the way, is gaining steam. That is for cameras to have little sensors that detect the orientation of the camera when a picture is taken, and mark the image generated with an "orientation tag" so that it can be automatically rotated to the correct orientation when displayed. Many cameras now support this feature, and PhotoReviewer will automatically use such orientation tags when it finds them. So if you're spending a lot of time rotating your images, you might consider investing in a new digital camera. Can I review images that I have imported into iPhoto?When images are imported into iPhoto, iPhoto makes a copy of them inside the "iPhoto Library". Users sometimes want to run PhotoReviewer on their iPhoto Library, or on a subfolder within it. This is not a good idea. The iPhoto Library is a private data store that belongs to the iPhoto application; if images in the library are moved, renamed or deleted, iPhoto may get confused and be unable to display its entire library. This is due to the way iPhoto is designed, and is not in any way PhotoReviewer's fault; modifying the iPhoto library in any way other than using the iPhoto application is simply not supported and is a very bad idea. Deleting things out of your iPhoto library using the Finder would yield equally bad results. For this reason, it is reasonable to treat iPhoto's library as a "black box" which photos go into but do not come out of (except in the ways that the iPhoto application supports). For this reason, some users keep a copy of their original photographs archived separately from their iPhoto library, and we would recommend this as a precautionary measure. If you have such a separate archive, you can use PhotoReviewer on that archive (or on a copy of it) and then re-import the reviewed archive into iPhoto. If you do not have such an archive, then you can use only the iPhoto application to review your photographs; running PhotoReviewer on your iPhoto library risks data corruption and loss for the reasons explained here. In fact, it is safe to run PhotoReviewer on your iPhoto library provided that you do not modify the library in any way. You can do a review in which approved images are copied and vetoed images are left in place, for example. Be extremely careful that you set up your review correctly, however, as one incorrect setting may lead to corruption of your iPhoto library. Also be aware that the format and setup of the iPhoto library is private and may change from one version of iPhoto to the next, and that the library may contain multiple copies of your images at different resolutions, with and without changes you have made in iPhoto, etc. Tread carefully and keep backups, or better yet, come up with a workflow that does not require you to do this. What known bugs and issues affect PhotoReviewer?A known issue affecting PhotoReviewer at this time is the possibility of bugs in Apple's image display code. PhotoReviewer uses code written by Apple to read in and display images. PhotoReviewer has no control over the behavior of that code, and no way to fix bugs that may exist in it. Because of such bugs, particular images may fail to display, even though other applications can display them just fine. (Those other applications are not using the same Apple code to display images, so they aren't bitten by the same bugs). Some images may even make PhotoReviewer crash due to bugs in Apple's image handling code; that is quite rare, but not unheard of, particularly in certain releases of OS X. Again, PhotoReviewer has no control over this; there is nothing PhotoReviewer can do to keep Apple's code from crashing. If you encounter a problematic image, we suggest that you complain to Apple through whatever channels may be available to you. PhotoReviewer version 2.0 and later try to catch crashes due to image loading bugs and report them to you; if this mechanism works, you will be told which image crashed you, and you can remove it from your review folder and try again. Unfortunately, that's the best we can do. On the bright side, Apple seems to have started taking their image reading code much more seriously, and crashes due to corrupted images seem to be mostly a thing of the past. Particular bugs may exist in Apple's code with respect to particular image formats. For example, raw files with a ".NEF" extension were read incorrectly by older versions of OS X; as a result, only the thumbnail of the image was displayed. The recommended workaround is described in What's the best way to work with raw images?. If you see problems with incorrect display of images, do report them to us at Stick Software; we like to stay on top of the state of things, so hearing reports from users is always useful, and we may be able to report the problem to Apple to expedite a fix. But please do recognize that ultimately these issues are out of our control. One behavior of PhotoReviewer's is intentional, but may be surprising, so we'll mention it here. Suppose you are set up to move approved images to their own directory, and suppose you approve an image whose filename is, say, "barbecue.jpg". Then suppose you go to a friend's place the next day, there's a barbecue there, you take a photo, the photo gets named "barbecue.jpg", and it ends up in your review directory. The next time you run PhotoReviewer, you review that photo and decide to approve it (it really is a splendid barbecue photo). PhotoReviewer now needs to move it to the approved directory; but the older file named "barbecue.jpg" is already there. Well. PhotoReviewer is all about speed; it doesn't want to bother you with pesky details like this. So rather than forcing you to choose a new name to resolve the conflict, PhotoReviewer will generate a unique name by itself, without saying a word to you. You will discover it later, if you even care, when you look in your approved folder. Typically, the unique name might look something like "barbecue_73925.jpg"; PhotoReviewer will preserve the original filename, and add a random number to the end of it. When possible, it will keep using the same random number over and over, so if you had approved photos named "My barbecue.jpg", "Jim's barbecue.jpg" and "Molly's barbecue.jpg", and then approved another three photos with the same names, you might end up with "My barbecue_22534.jpg", "Jim's barbecue_22534.jpg" and "Molly's barbecue_22534.jpg". The hope is that this would help you keep related photos together; if they end in the same random number, they were probably processed by PhotoReviewer during the same session. This doesn't happen often in practice anyway, though, because usually people rename their images using PhotoReviewer's sequential numbering facility, which avoids this issue altogether. And as a closing note: the fact that the <escape> key hides PhotoReviewer is a feature, not a bug. It's a quick way to hide the app, since people have been known to be surfing through photos at times when they aren't supposed to be... What is shareware? How do I pay?As a closing note, we'd like to remind our readers that PhotoReviewer is a shareware product. Shareware is a method of distribution for software that lets you try the software before you pay for it; shareware is not free, in other words, only free to try. It is required that you pay the shareware fee if you use PhotoReviewer beyond a trial usage. PhotoReviewer costs $15. Please be worthy of our trust and pay for the software you use. Information on how to pay and other registration details can be found at http://www.sticksoftware.com/software.html, or you can simply pay with a credit card (or other methods) with no further ado at www.paypal.com. Comments on PhotoReviewer, suggestions for future products, and other feedback are welcomed at our support email address. Thanks for your support! |
||||||||||||||||

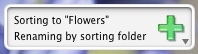
 So if you like the image you see, you can approve it by pressing the '+' key (which is by default bound to the "approve" action, although can be changed in Preferences), or by clicking the "Approve" toolbar button, or by choosing "Approve" from the "Image" menu, from the image's context menu, or from image's action indicator's menu; all of these do roughly the same thing (there is a small detail being finessed here that will be covered in
  Dragging a displayed image, on the other hand, will drag out a reference to the actual review file for that image. You could drag that file to another application; dragging it to Mail, for example, will start a new mail message with that image in the message body. Dragging a file to the Finder will let you either copy or link to that review file. You can also drag the file over to the thumbnail scroller on the left, to reorder the files in your review by moving the dragged file to a different position.
 A double-click in Thumbnail Mode will switch to Image Mode, so this is a fast way to "zoom in" on a thumbnail that you want to examine. If more than one image is selected, they end up being displayed side-by-side. A drag in Thumbnail Mode drags out a reference to a review file, just as in Image Mode, but with the extra ability to select and drag multiple files at once; this can be useful both for dragging to other apps (mailing your ten best photos to a friend), and for dragging within PhotoReviewer to reorder the images in your review.
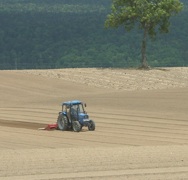
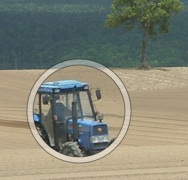
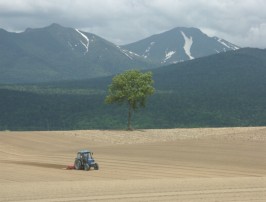
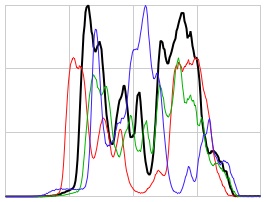
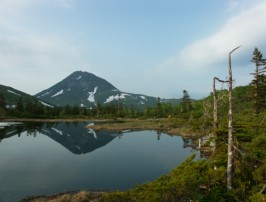
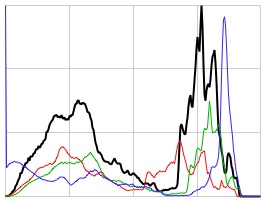
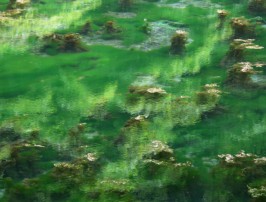
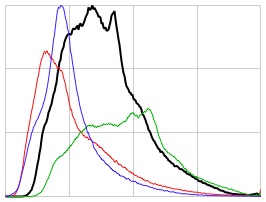
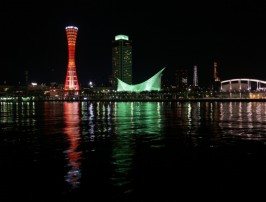
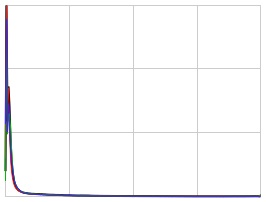
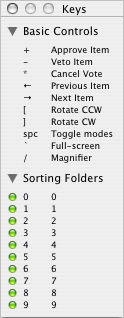 This tab is pretty obvious, so we're not going to cover it in excruciating detail. As the explanatory text at the top of it tells you, click a button to change a key binding, then hit the new key you want bound to that action. If you bind two different actions to the same key, red outlines will indicate the conflict, which you will need to resolve before closing the panel so that PhotoReviewer knows what to do when that key is pressed. The column of key controls on the left are for the ten sorting folders you can choose on the Sorting tab; the column on the right is for various actions like voting, moving from image to image, and so forth.
 As you're browsing among your images, you may encounter some images that need to be rotated. PhotoReviewer provides menu items and toolbar buttons that allow you to rotate your images clockwise or counterclockwise, so you can do that easily. But there is an issue involved that needs to be discussed.